
The APA (Y'know, the plywood people) recently unveiled a new video outlining advanced framing and how easy it is to achieve in your building. If you're still building at 16" o.c. with redundant studs at corners, windows, and T-walls, see this video. These techniques actually ask you to do LESS in your building while achieving cheaper costs, a more comfortable home, environmental friendliness. If you still balk then I won't stop you from building substandard home. But for the future of your income, please at least consider staging these techniques into your repertoire of framing practices.
By way of reminder, it's not the number of studs that keep your house from blowing down or siding from warping, it's the use of plywood gapped per manufacturer's specs that achieves strength and durability.
Friday, December 13, 2013
Tuesday, November 19, 2013
Portland, Here We Come!
Maybe we're not physically traveling, but we've created some new plans in celebration of this amazing city. Given the amount of land the planning commission has sway over, we saw the wisdom in customizing a plan to fit into an odd yet common scenario. If you own a 50x100 corner lot that was originally platted as two 25x100 lots, you are allowed to reclaim those two lots and split it any way you like. So long as each lot has at least 1800 square feet and each lot faces a different street.
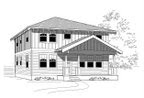
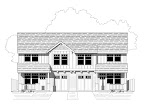
A common result is to have the original house face forward and a brand new 36x50 lot facing a side street. Setbacks and required outdoor spaces what they are, a slightly convoluted 26x35 footprint remains. Restricted cantilevers over setbacks are allowed but we chose to start with the confines and see what would happen. We ended up with 3 new plans.
The Portland and Portland A are both very similar plans with different facades. Both have 1758 square feet, an attached garage (rare for us), 3 bedrooms, 2.5 baths, great room. Essentially what you'd expect from a house these days. The roof and upper floor has been configured such that you could have a livable attic if you so chose.

The Portland B is a slightly different beast that attempted to open up the main floor by adding a garage under. Alongside the garage and integrated into the house is an accessory dwelling unit, also beloved by the Portland Planning Commission. With the ADU it weighs in at 2046 square feet with 4 bedrooms and 3.5 baths.

We are currently in the process of creating a brand new website. If you want a sneak peek you can click on the links above to see them in our new format. When the site is active in the next few days or weeks we'll make a grand announcement.
In the meantime, please tell us how we could improve these new offerings!
A common result is to have the original house face forward and a brand new 36x50 lot facing a side street. Setbacks and required outdoor spaces what they are, a slightly convoluted 26x35 footprint remains. Restricted cantilevers over setbacks are allowed but we chose to start with the confines and see what would happen. We ended up with 3 new plans.
The Portland and Portland A are both very similar plans with different facades. Both have 1758 square feet, an attached garage (rare for us), 3 bedrooms, 2.5 baths, great room. Essentially what you'd expect from a house these days. The roof and upper floor has been configured such that you could have a livable attic if you so chose.
The Portland B is a slightly different beast that attempted to open up the main floor by adding a garage under. Alongside the garage and integrated into the house is an accessory dwelling unit, also beloved by the Portland Planning Commission. With the ADU it weighs in at 2046 square feet with 4 bedrooms and 3.5 baths.
We are currently in the process of creating a brand new website. If you want a sneak peek you can click on the links above to see them in our new format. When the site is active in the next few days or weeks we'll make a grand announcement.
In the meantime, please tell us how we could improve these new offerings!
Tuesday, August 20, 2013
What I Didn't See
Normally we get to draw our plans on paper and then ship them off to a builder, never to be heard from again. But a recent purchase of the Arleta 2850 was being built a couple of hours away and we just happened to be driving through very recently. The house is very nearly done just needing final trim and landscaping. It looks nice. But not what we pictured...
The house was built in a fairly lax jurisdiction so the builder was able to change some windows and structural issues without much fuss. Unfortunately the effect of replacing sets of single hungs with gigantic sliding windows killed some of the period effects. As did the rounded sheetrock corners, lack of wood trim, casing, and floors. Now it's understood that most people these days prefer carpet in bedrooms but we find it unappealing. The front porch was unfinished but at this point we're not holding out for a miracle.
Lesson learned? Not quite sure yet. While our plans are purposefully Spartan on details, we do get disappointed when our vision isn't matched. Perhaps a set of SketchUp images showing our vision for the plan would be in order. In fact this plan has some rough sketches ready, they just need some refining and uploading. Perhaps that's the rub.
If ever you purchase an Istockhouseplans house plan and would like some direction towards creating a Craftsman or period look, please let us know and we'll be happy to put together a 3-d image for you. Just one more service that we offer.
Wednesday, August 7, 2013
And Here's the First Pitch!
Roof pitches are expressed in several ways depending on where you are building. Common in the United States is to use a number over 12. That is, for every 12 inches you go horizontally, a certain pitch will go up a certain number of inches. A 4/12 pitch roof goes up 4" for every foot it goes out. It's a rather shallow roof, easy to walk on but still sheds rain in all but the most of monsoons. It's not highly aesthetically pleasing though unless it utilizes 3' overhangs for a prairie style look. An 8/12 pitch roof CAN be walked on with the right shoes but also looks much better and can have livable attic space. This convention can be used for any number. A 16/12 roof is not unheard of. A 21/12 pitch roof will give you a nice equilateral triangle. Though most designers won't even think about it, it is perfectly acceptable to call out a 5.71/12 pitch roof if that would help make the roof plane 20' even instead of 20'-7.5".
In other countries where the X over 12 makes less sense due to the metric system, degrees of pitch can be used. This is almost simpler on one hand. But building it in the field requires a different skill set or tool. A high schooler might immediately understand a 30° pitch roof better than 7/12.
For your convenience here is a simple chart showing the comparison of roof pitches to angles:
Or you can use this handy calculator.
Istockhouseplans strives to make the best use of your materials. If you would like us to analyze your plan and convert roof pitches to the most economical use of your lumber, please contact us.
In other countries where the X over 12 makes less sense due to the metric system, degrees of pitch can be used. This is almost simpler on one hand. But building it in the field requires a different skill set or tool. A high schooler might immediately understand a 30° pitch roof better than 7/12.
For your convenience here is a simple chart showing the comparison of roof pitches to angles:
| 1/12 | 4.76° |
| 2/12 | 9.46° |
| 3/12 | 14.04° |
| 4/12 | 18.42° |
| 5/12 | 22.62° |
| 6/12 | 26.57° |
| 7/12 | 30.26° |
| 8/12 | 33.69° |
| 9/12 | 36.87° |
| 10/12 | 39.81° |
| 11/12 | 42.51° |
| 12/12 | 45° |
| 14/12 | 49.40° |
| 16/12 | 53.13° |
| 18/12 | 56.31° |
| 21/12 | 60.26° |
| 24/12 | 63.43° |
| 27/12 | 66.04° |
| 30/12 | 68.20° |
| 45/12 | 75.07° |
Or you can use this handy calculator.
Istockhouseplans strives to make the best use of your materials. If you would like us to analyze your plan and convert roof pitches to the most economical use of your lumber, please contact us.
Tuesday, June 18, 2013
Garage to ADU Conversion Problems
When doing math it sometimes gets tricky in the conversions. How many litres in a pint? How many centipedes in a decibel? Likewise it can get tricky converting a garage to an ADU. Let's pretend that your local jurisdiction is not an issue and look at the inherent problems. (Note, please always consult with your local jurisdiction and get a permit where required.)
The first issue would be the floor. Most contractors would be happy to leave the floor as a slab and call it good. Maybe put a carpet over it. Nothing could be worse. You have no idea what's under that slab. It could be sand, gravel, or bare dirt. There may or may not be a vapor barrier under there either. Concrete is nothing more than a rigid sponge. Placing a carpet over the top just gives latent moisture somewhere to make dank and moldy. Don't do it.
Instead, consider laying some 6 mil vapor barrier down over the slab first. There is likely no insulation under there either so a few inches of rigid foam insulation would help to keep the dewpoint away from your materials that are susceptible to mold. After making sure all joints are sealed, overlay with a floating wood floor. Looks nice too.
Hopefully walls and ceilings would be straightforward. Always check for and mitigate any moisture in the walls, make sure the wiring is correct, and get inspected if necessary before applying sheetrock. Fill the space with insulation before making it inaccessible.
Another big issue to consider is the street appeal. The general rule of thumb is to throw some sort of window into the former garage door opening and frame around it. This looks wrong on several levels. First, the garage door header is generally not equal to other windows or doors. If the garage is freestanding then this is less of an issue. But if the garage door is near other windows and doors it can look discontinuous.
The expensive option is to cut out the header and make it the same as other headers on the front of the house. Another option would be to consider something such as two 3/0x5/0 single hung windows. The vertical aesthetic of the windows can help soften the horizontal issue. Another option which happened near here was to remove the garage door but build an inside wall that looks like a garage door from the outside. Windows were already on the side of the garage. This looked really nice. Unfortunately the local jurisdiction in all their wisdom required a window in the front. In vulgar terms it looks really dorky now. Perhaps a sliding glass door could be considered as another option.
Another issue that can come up is the parking space. If you have less than 16' in front of your garage to begin with you may lose an onsite parking space. Some jurisdictions might think this a big deal. Others won't. A driveway going up to a blank wall does not fool the eye. We have grown to expect a garage door at the end. If that garage door is gone then the driveway needs to be reimagined in order for the eye to accept a wall at the end.
If there is room then landscaping or a bench will help soften the transition. The amount of concrete in the driveway could also be reduced. Leave a couple of 30" strips with 24" between them. Everything else should be returned to grass or other low, resilient plantings. If your budget allows, put in driveable molds or spaced pavers that allow grass to grow in between them. Some folks may not appreciate the look of parking a car in grass but it may suit others' needs.
If you are converting a garage into an ADU, Istockhouseplans would be pleased to give advice. Send us an email or leave a comment below.
 |
| Looks normal but the owners want more living space |
The first issue would be the floor. Most contractors would be happy to leave the floor as a slab and call it good. Maybe put a carpet over it. Nothing could be worse. You have no idea what's under that slab. It could be sand, gravel, or bare dirt. There may or may not be a vapor barrier under there either. Concrete is nothing more than a rigid sponge. Placing a carpet over the top just gives latent moisture somewhere to make dank and moldy. Don't do it.
Instead, consider laying some 6 mil vapor barrier down over the slab first. There is likely no insulation under there either so a few inches of rigid foam insulation would help to keep the dewpoint away from your materials that are susceptible to mold. After making sure all joints are sealed, overlay with a floating wood floor. Looks nice too.
Hopefully walls and ceilings would be straightforward. Always check for and mitigate any moisture in the walls, make sure the wiring is correct, and get inspected if necessary before applying sheetrock. Fill the space with insulation before making it inaccessible.
Another big issue to consider is the street appeal. The general rule of thumb is to throw some sort of window into the former garage door opening and frame around it. This looks wrong on several levels. First, the garage door header is generally not equal to other windows or doors. If the garage is freestanding then this is less of an issue. But if the garage door is near other windows and doors it can look discontinuous.
 |
| Slap in a window. Well, it's functional at least. Yeesh. |
The expensive option is to cut out the header and make it the same as other headers on the front of the house. Another option would be to consider something such as two 3/0x5/0 single hung windows. The vertical aesthetic of the windows can help soften the horizontal issue. Another option which happened near here was to remove the garage door but build an inside wall that looks like a garage door from the outside. Windows were already on the side of the garage. This looked really nice. Unfortunately the local jurisdiction in all their wisdom required a window in the front. In vulgar terms it looks really dorky now. Perhaps a sliding glass door could be considered as another option.
 |
| This looks a little more purposeful... |
 |
| A cabin perhaps? May or may not work. |
Another issue that can come up is the parking space. If you have less than 16' in front of your garage to begin with you may lose an onsite parking space. Some jurisdictions might think this a big deal. Others won't. A driveway going up to a blank wall does not fool the eye. We have grown to expect a garage door at the end. If that garage door is gone then the driveway needs to be reimagined in order for the eye to accept a wall at the end.
If there is room then landscaping or a bench will help soften the transition. The amount of concrete in the driveway could also be reduced. Leave a couple of 30" strips with 24" between them. Everything else should be returned to grass or other low, resilient plantings. If your budget allows, put in driveable molds or spaced pavers that allow grass to grow in between them. Some folks may not appreciate the look of parking a car in grass but it may suit others' needs.
 |
| Sweet Stickley, can we live here? That bay, that driveway. What lovely lines! |
If you are converting a garage into an ADU, Istockhouseplans would be pleased to give advice. Send us an email or leave a comment below.
Tuesday, May 28, 2013
Accessing Your Nether Regions
If you build on a crawl space type of foundation then you're going to be required to provide access to that space for future maintenance and dead opposum removal. Most crawl spaces are required to have a minimum clearance of 18" from grade to the bottom of the framing members. This is not exactly a pleasant distance to crawl around in but it is at least workable.
What's in your crawl space? Well not much. But there is access to plumbing, mechanical (if you don't care about energy efficiency), and some electrical. There's also dirt, dust, spiders and possibly dead animals. Maybe there's a drain down there. It's possible to go years and years without ever having to go down there. But at some point a visit may be required.
Let's say your waste drain springs a leak. The waste drain doesn't exactly have crystal clear water in it. This will require a technician to crawl down into the space with tools and equipment to fix the problem and remove any extras that shouldn't be under your house. They likely will be up and down several times. So where is the most likely spot for the crawl access to be?
Believe it or not we often see other designers and architects place this crucial portal in the master bedroom closet.
Really? Can you see the disgust on our faces?
Not only that but apparently this practice is so ingrained in some designers (and builders even) that they will place the access here regardless of convenience. If the carpeted master closet is in the far corner of the house this means that dirty nasty crawl space detritus will be making it's way through most of the house starting with your wife's blouses.
We at Istockhouseplans believe that there is a better option. Our first choice is to place the access in a hall closet preferably where the floor is hardwood. However an even better choice would be to place the access outside of the house completely. In some parts of the country this is more common than others. Placing the crawl access on the outside of the foundation has several advantages:
- Dirty crawl space objects will never enter your house
- The repairman won't have to worry about your wife's clean white laundry
- Most important, the crawl space hatch can't leak warm air out of your house
Tuesday, May 14, 2013
From Paper to Sticks
We were recently invited to an open house for a custom design we did. Actually, we didn't design so much as we did draft. The homeowners were very gracious but also very particular about what they wanted in a home. The result was a 2200sf plus beautiful one story home. Neighbors in the development quipped that they wished they had seen this plan in the builder's catalog. Even the builder himself was impressed with the final product. The development consists primarily of mid-priced builder specials with the customary 2 car garage, 2 story, 3 bed plus bonus, 2.5 bath. Our home was a little more subtle. We went for 3 car garage (partial tandem), 1 story (with nice steep roof for aesthetics), 3 bed plus office, and 2 bath.
While this is not a home that we would normally put in our catalog we were pleased with the results. So were the homeowners. Throughout the process we kept telling them that this will be THEIR home. The builder or subs will not be living in it for the next 10-50 years. THEY will. So don't get pushed around and be sure to get what you want. The homeowners kept a set of final plans, a 3-ring binder, and the builder on speed dial for the whole time. Every day they were on site checking progress. This was more out of excitement and available time than anything but scrutiny was also prevalent. When something was not done per plans a query was put out and it was quickly made right. Though our client probably did not read this previous post beforehand, they took it to heart.
The bad news of the whole deal? The washer and dryer were moved on-site and now partially obscure a passage. The good news? The homeowners were in by Christmas and the builder's crew got the week off.
Tuesday, April 30, 2013
Gained Some Girth, Have You?
Of all of our plans there are a few that stand out as stellar. Maybe they don't have gorgeous granite countertops or three car garages. Maybe they're not opulent McMansions. But they do sell well. The Montavilla 2532 has been our second best selling plan. But it's not the plan itself that is always sold, it sometimes is the idea. We've several times been asked to add two more feet into the width of the plan. This is a great idea as it helps give some space to the garage and staircase.
In response to this we have released a cousin to the Montavilla called the Villamont (see what we did there?) The Villamont and Villamont A are both 27' wide versions of the Montavilla plans. We could have called these the Montavilla C and D but they are unique enough in their own right to get top billing. Both plans add 306 more square feet as well to round out at 1674 square feet.
This is a great example of an Istockhouseplans offering adapting to customers' needs. If you have any other changes you'd like to see in our plans, leave us a note in the comments or contact us directly.
Tuesday, April 16, 2013
ADU, Do You?
Here at Istockhouseplans we have been pleased to be consulted for several local Accessory Dwelling Unit (AKA ADU, granny flat, lane housing) projects. Most, but not all, of these projects involve the homeowner creating an ADU space to move into so that they can rent out their house. We would expect the other way around. We've designed a 12x24 garage conversion, are working on turning a bonus room into an ADU, and are drafting up plans for an addition and ADU. Most of our work is in the Great Northwest but the ADU projects are very specific to Portland. Portland has very graciously extended two huge benefits to ADU builders. The first is square footage requirements. Used to be that you could build an ADU to 30% of the house square footage, max 800sf. Now that has increased to 75% of the house, still 800sf. This means smaller 1000sf homes don't have to try to work living space into 300sf, they can shoot for 750sf. But really, 300sf is still doable.
The second benefit is the temporary elimination of systems development charges on a permit when building an ADU. In some cases this fee can be thousands and thousands of dollars. But in order to try to encourage higher density (and avoid sprawl) the fees are reduced or in most cases eliminated for a while. The one caveat with all ADU spaces is that the property owner must live either in the house or the ADU. Not allowed to rent out both. Not that that stops folks from doing so.
If you've been considering an ADU on your property, let us know if we can help. We already have a host of plans that could be used for an ADU as well as garage options with living space. Of course every property is different. If nothing works for you let us know. We are eager to design small and beautiful.
Subscribe to:
Posts (Atom)


