Showing posts with label moisture. Show all posts

Tuesday, June 18, 2013

Garage to ADU Conversion Problems

When doing math it sometimes gets tricky in the conversions.  How many litres in a pint?  How many centipedes in a decibel?  Likewise it can get tricky converting a garage to an ADU.  Let's pretend that your local jurisdiction is not an issue and look at the inherent problems.  (Note, please always consult with your local jurisdiction and get a permit where required.)

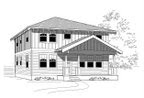
Looks normal but the owners want more living space


The first issue would be the floor.  Most contractors would be happy to leave the floor as a slab and call it good.  Maybe put a carpet over it.  Nothing could be worse.  You have no idea what's under that slab.  It could be sand, gravel, or bare dirt.  There may or may not be a vapor barrier under there either.  Concrete is nothing more than a rigid sponge.  Placing a carpet over the top just gives latent moisture somewhere to make dank and moldy.  Don't do it.

Instead, consider laying some 6 mil vapor barrier down over the slab first.  There is likely no insulation under there either so a few inches of rigid foam insulation would help to keep the dewpoint away from your materials that are susceptible to mold.  After making sure all joints are sealed, overlay with a floating wood floor.  Looks nice too.

Hopefully walls and ceilings would be straightforward.  Always check for and mitigate any moisture in the walls, make sure the wiring is correct, and get inspected if necessary before applying sheetrock.  Fill the space with insulation before making it inaccessible.

Another big issue to consider is the street appeal.  The general rule of thumb is to throw some sort of window into the former garage door opening and frame around it.  This looks wrong on several levels.  First, the garage door header is generally not equal to other windows or doors.  If the garage is freestanding then this is less of an issue.  But if the garage door is near other windows and doors it can look discontinuous.

Slap in a window.  Well, it's functional at least.  Yeesh.


The expensive option is to cut out the header and make it the same as other headers on the front of the house.  Another option would be to consider something such as two 3/0x5/0 single hung windows.  The vertical aesthetic of the windows can help soften the horizontal issue.  Another option which happened near here was to remove the garage door but build an inside wall that looks like a garage door from the outside.  Windows were already on the side of the garage.  This looked really nice.  Unfortunately the local jurisdiction in all their wisdom required a window in the front.  In vulgar terms it looks really dorky now.  Perhaps a sliding glass door could be considered as another option.

This looks a little more purposeful...

A cabin perhaps?  May or may not work.


Another issue that can come up is the parking space.  If you have less than 16' in front of your garage to begin with you may lose an onsite parking space.  Some jurisdictions might think this a big deal.  Others won't.  A driveway going up to a blank wall does not fool the eye.  We have grown to expect a garage door at the end.  If that garage door is gone then the driveway needs to be reimagined in order for the eye to accept a wall at the end.

If there is room then landscaping or a bench will help soften the transition.  The amount of concrete in the driveway could also be reduced.  Leave a couple of 30" strips with 24" between them.  Everything else should be returned to grass or other low, resilient plantings.  If your budget allows, put in driveable molds or spaced pavers that allow grass to grow in between them.  Some folks may not appreciate the look of parking a car in grass but it may suit others' needs.

Sweet Stickley, can we live here?  That bay, that driveway.  What lovely lines!


If you are converting a garage into an ADU, Istockhouseplans would be pleased to give advice.  Send us an email or leave a comment below.

Tuesday, March 6, 2012

What NOT to do

Due to mounting pressures in other arenas, last week's blog post missed the mark.  But we are prepared this week to offer a small round of funnies.  Please always background check your contractor and make yourself aware of energy efficiency practices.


We are particularly fond of the fixed R-21 door:


Tuesday, November 16, 2010

Water, water everywhere

What would life be without good old H-2-O?  Dead, that's what.  If a little water is good, more should be better, right?  If you've been around the block even once you know that the standard answer to this formulaic question should be 'no'.

And of course it's no!  Especially when we consider your house, your biggest investment, your protection from the elements, prying eyes, and the marauding huns.  Why do builders let water pile up on a wood subfloor, leave their materials in the rain and mud, and install insulation and drywall over wet wood?  How would they feel if their truck was built this way?

Building in the rain.  In some parts of the country, this is a fact of life that is unavoidable.  If it takes 3 months to frame a house, you are guaranteed a few rainy days.  Since no one (not even weathermen) can accurately predict the weather beyond the next day, it is impossible to completely frame a house dry.  Arizona, sure.  Not in the Pacific Northwest though.  But there are steps that can be taken to keep things as dry as possible.  First, don't plan to build in January.  Second, invest a few dollars in cheap insurance.  If you are building an elevated wood floor (that is, a crawlspace not a slab), make your last step include a giant paint roller with a long handle and a discounted bucket of 5 gallon paint, color unimportant.  This will protect your wood floor from standing water.  Walls go up, roof goes up, and then sheathing as soon as possible.  If there will be any amount of lag time getting the finish roof on, again paint the roof deck.  The problem here is that there are always spaces between roofing panels and water will leak through.  The worst spot is the peak, especially if a ridge vent is planned.  This gives a beautiful 6" wide by 20' long space for rain to come right in.  If you have a butterfly roof, don't build in the rain as this would make a funnel.

Finally, I don't care how tight your schedule is, buy a $13 moisture meter from Harbor Freight and don't do anything else until the moisture content is below 19%.  Since the aforementioned tool has an accuracy rating of +/-2% for wood, go for 17%.  Why 19%?  Most mold and fungus will not thrive below that and most insects will move out.  It wall also allow better equilibrium in the wood resulting in less drywall cracks and creaking of the home.  Further, it will reduce the amount of moisture trapped in the walls.  Even further, some codes require this.

Storing your materials.  Too often we go to construction sites and see a pile of 2x6 sticks sitting in the mud getting rained on.  Double you tee eff.  How is this okay?  What part of this makes you feel good?  If you were a pig or a toad, maybe,  Spend a few bucks for some pallets to keep your wood off the ground, then get some tarps or used billboard vinyls.  "Why would I spend hundreds on this?"  Hundreds?  No, less than that.  Did you even click the link?  A 10'x30' used vinyl is $60.  And you spend less than a hundred on this to get your moisture content down and save thousands on a callback.  Please don't be that short-sighted.

Think of it this way; the less moisture the wood takes into the house, the less time you need to wait for it to dry out.

Protecting your product.  Your product is the house and it's only worth the amount of trouble free time it will stand.  If moisture gets into the wall, the value ends.  Your goal is to manage the moisture that gets into the wall.  Not to keep moisture out of the wall, but to manage it.  It will get in.  From the outside.  Unless you are installing double welded steel siding, wind and thermal will drive moisture behind the siding.  At this point you have two options.  The first is to pretend it doesn't happen.  The second is to manage it.

So you've decided to manage your water issue.  The first step is admitting you have a problem so you're already on the way.  The second step is called a rainscreen.  There are several off the shelf products that can achieve this concept.  You can also use scrap plywood on site to create 2-3" battens and manage the water.  The idea is that the water that gets behind the wall then drains in a wide enough plane to not get stuck via capillary action and then drain out a screen at a bottom.  Water that freely drains is no longer available to stick around via surface tension and find crevices and cracks in your construction and seep into the wall.  Water in the wall can wet insulation, rendering it useless.  It can also harbor mold, mildew, and insects, hazarding your house and it's occupants' health.  If you have any lick and stick fake stone veneer, this is tantamount as the stuff is like a sponge.  It will readily take in water and hold it.  When the sun comes out, it will be driven back and then be held against your sheathing or building paper.  Compounds in the mortar then eat away at the paper and the moisture is free to roam about your wood sheathing.

Getting it right.  Contact Istockhouseplans for CAD details about how to handle this moisture.  We can spec out a rainscreen for you and make sure your final product is the best possible.

Tuesday, October 21, 2008

Are you a Master Craftsman?

Hey Joe Builder, how would you define the quality of your work? Above average? Awesome! But it is statistically impossible for everybody to be above average. Better than most? It is also statistically impossible for everyone to be better than most everybody else. But I'm willing to give you the benefit of the doubt if you'll just answer a few questions:

1. What sort of measurement tolerance out of plane are you comfortable with?
A. Huh?
B. As long as it all comes together
C. As long as my eyeball doesn't notice
D. I am familiar with a crowbar and sledgehammer
E. Absolutely none! I don't know why it takes me a year to build...

2. What do you do with bowed studs?
A. Never seen one
B. Give 'em a kick
C. Crown 'em to the outside
D. Shims and a plane
E. I only use #1 grade lumber everywhere

3. How many dumpsters does it take to clear your site after a home is finished?
A. As many as it takes!
B. 3 or more
C. 1-2
D. I sort all of my waste for recycling
E. My purchase orders have a 0% overage estimate

Scoring: 1 point for each A answer, 2 points for each B, etc.

How did you do?

3-7 points: Please, for the environment's sake, STOP BUILDING!
8-10 points: You are the norm and could learn some things for a better bottom line.
11-14: Nice work buddy, our hat's off to you.
15: We bow to your craftsmanship but worry about your mental health.


Why does this matter? Because you could be saving money, energy, time, and materials by learning to build more energy efficient. Our details are a good start. Talk to your local utility or bookmark www.buildingscience.com to learn about more efficient building techniques. Especially now, your bottom line matters. Email us if you'd like to learn more.

Tuesday, July 15, 2008

Flashers unite!

How many of you think that you can flash properly? Do you layer properly? Do you make sure potentially exposed parts get sealed off? Does anyone really know what's going on behind your exterior? Check out this video and learn to be a great flasher!


Expert carpenter, Carl Hagstrom, shows how to properly flash a window.